ET|06 Protobuf与网络通讯
Protobuf
序列化/反序列化
- 序列化 :Class实例对象 »> byte、xml、json等
- 反序列化 :byte、xml、json等 »> Class实例对象
序列化的好处有很多,比如可以存到硬盘,比如可以压缩数据等等
Protobuf
类似于json的一种序列化格式,可以做到数据压缩更小,反序列化速度更快
是谷歌开源的一种数据存储格式,需要我们定义好Proto描述文件,然后通过谷歌提供的对应的代码生成工具,生成对于语言的代码

工程内的Proto描述文件,位于./Proto中
- OuterMessage 客户端与服务端通信
- InnerMessage 服务器之间进行通讯
- MongoMessage 服务器之间进行通讯,但可以传送Entity
打开InnerMessage.proto,可以看见头两行有一个定义
syntax = "proto3";
package ET;
语法是Proto3(注意,不同版本的Proto语法是不一样的)
第二行就是一个命名空间了
尝试写一个测试消息
message C2M_Test
{
	int32 RpcId = 90,
	string test = 1
}
然后运行文件夹下的bat生成文件
然后可以在此处找到对应的生成代码

[ResponseType(nameof(M2C_TestResponse))]
[Message(OuterOpcode.C2M_TestRequest)]
[ProtoContract]
public partial class C2M_TestRequest: Object, IActorLocationRequest
{
   [ProtoMember(90)]
   public int RpcId { get; set; }

   [ProtoMember(1)]
   public string request { get; set; }

}

[Message(OuterOpcode.M2C_TestResponse)]
[ProtoContract]
public partial class M2C_TestResponse: Object, IActorLocationResponse
{
   [ProtoMember(90)]
   public int RpcId { get; set; }

   [ProtoMember(91)]
   public int Error { get; set; }

   [ProtoMember(92)]
   public string Message { get; set; }

   [ProtoMember(1)]
   public string response { get; set; }

}
会生成2个结构,C2S以及S2C的
注意,ET中的proto生成器,并非谷歌提供的版本,而是ET项目自己提供的

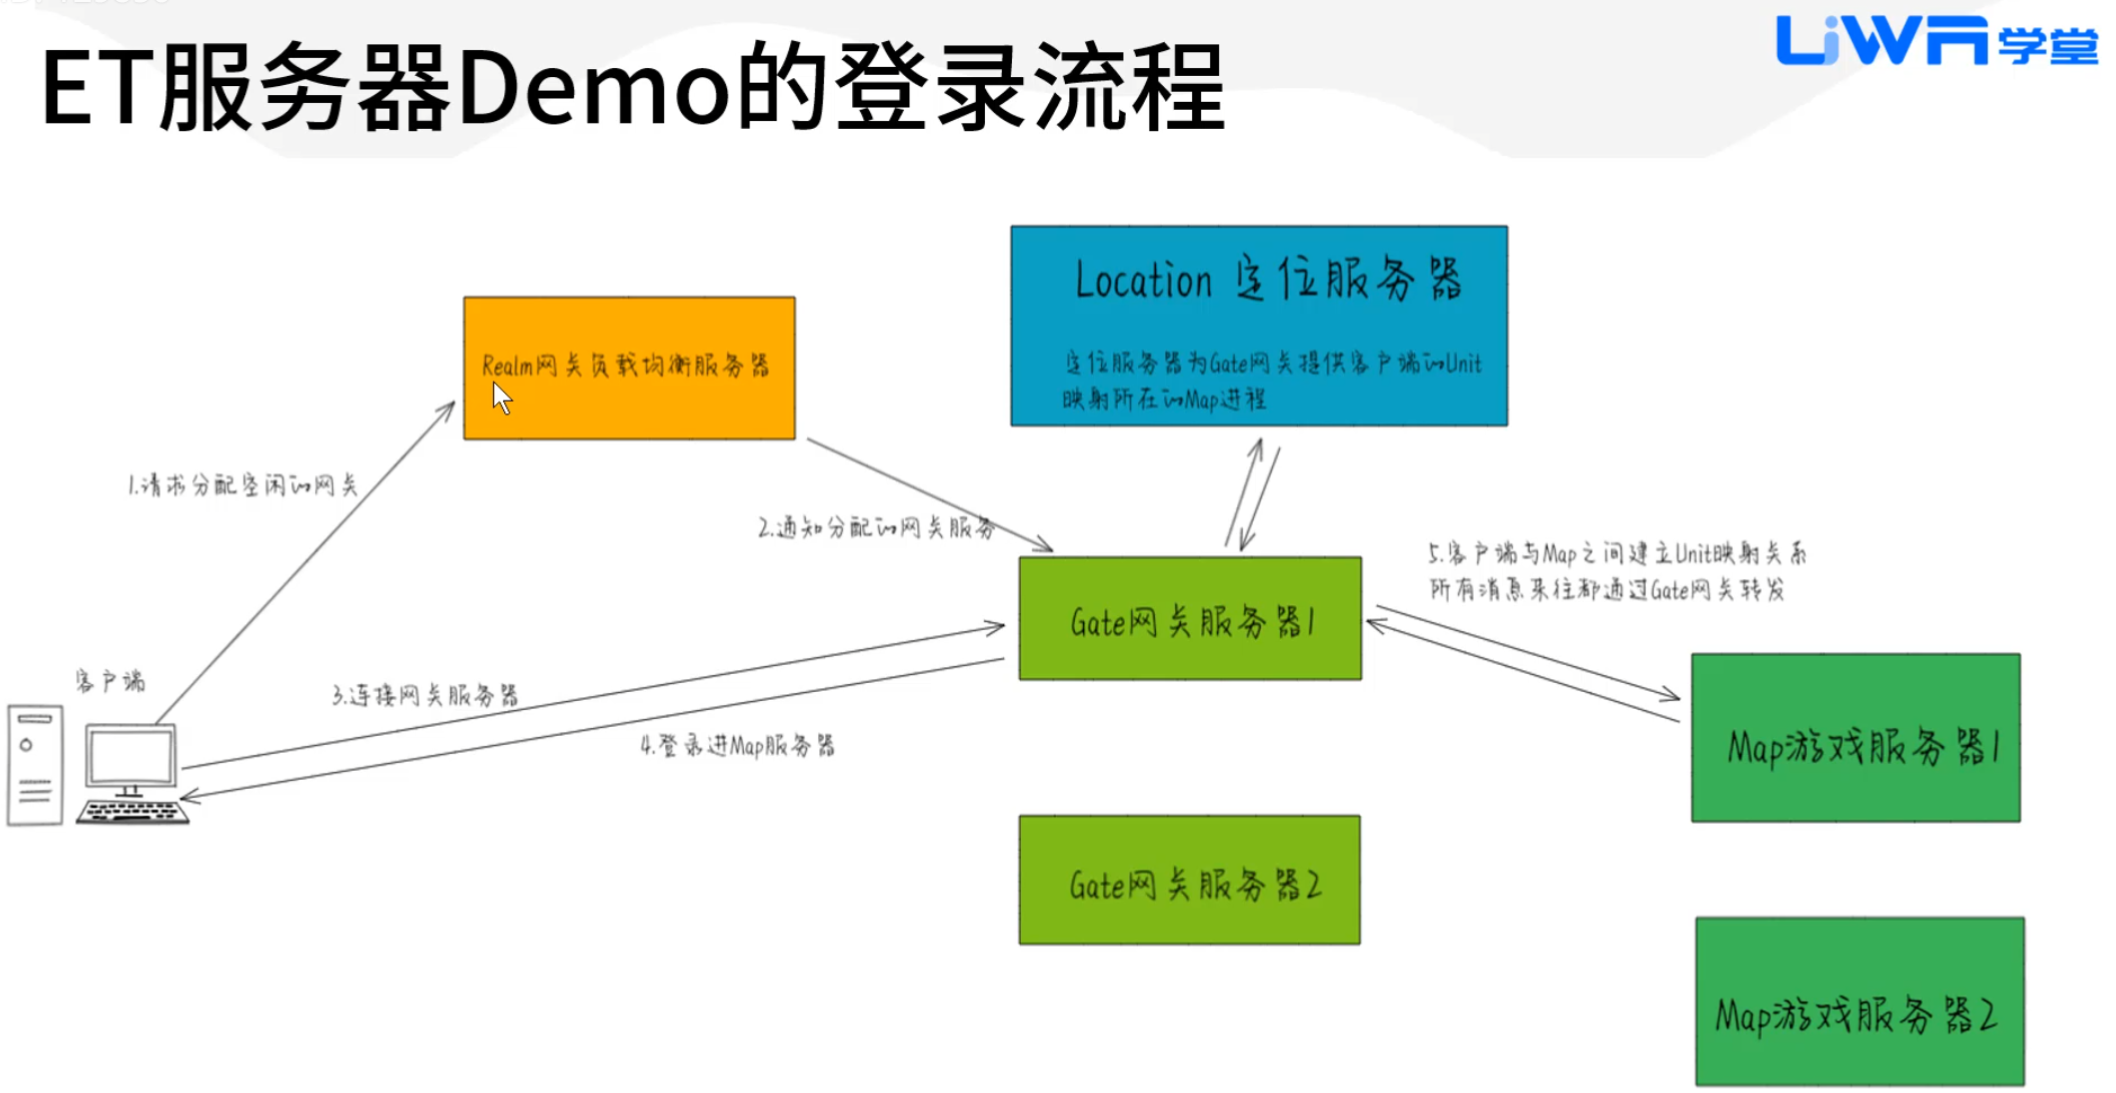
登录流程

添加协议
添加一条客户端发送给服务器的直连协议,不经过网关,所以添加到OuterMsg中
//ResponseType R2C_LoginTest 注意:这里一定不能多加空格
message C2R_LoginTest // IRequest
{
	int32 RpcId = 90;
	string Account = 1;
	string Password = 2;
}
- C2R 客户端发送给网关负载均衡服务器
- RpcId 如果这条消息需要服务器回复,那么需要添加,固定为90,此时必须添加IRequest注释,并且在消息前增加一行注释,标明回复的消息类型
对应的服务器回包
message R2C_LoginTest // IResponse
{
	int32 RpcId = 90;
	int 32 Error = 91;
	string Message = 92;
	string GateAddress = 1;
	string Key = 2;
}
- Error 错误码,固定91
- Message 消息体,固定92
顺便再写两条客户端/服务端单向的测试协议
message C2R_SayHello // IMessage
{
	string Hello = 1;
}

message R2C_SayGoodbye // IMessage
{
	string Goodbye = 1;
}
此时不需要RpcId,并且注释为IMessage
登录逻辑
客户端
找到我们的LoginHelper类(Client\Hotfix\Demo\Login)
里面有一个默认登录方法,不管他,我们添加一个
public static async ETTask LoginTest(Scene zoneScene, string address)
{
    try
    {
        ...
    }
    catch (Exception e)
    {
        Log.Error(e.ToString());
    }
}
进一步细化逻辑
public static async ETTask LoginTest(Scene zoneScene, string address)
{
    try
    {
        Session session = null;
        R2C_LoginTest r2CLoginTest = null;
        try
        {
            // 创建一次会话
            session = zoneScene.GetComponent<NetKcpComponent>().Create(NetworkHelper.ToIPEndPoint(address));
            // 对于需要服务器回包的消息,用Call,并且await
            r2CLoginTest = (R2C_LoginTest)await session.Call(new C2R_LoginTest() { Account = "", Password = "" });
            Log.Debug(r2CLoginTest.Key);
            // 对于不需要服务器回包的消息,直接Send
            session.Send(new C2R_SayHello() { Hello = "Hello" });
        }
        finally
        {
            // 最终记得释放会话
            session?.Dispose();
        }
    }
    catch (Exception e)
    {
        Log.Error(e.ToString());
    }
}
然后新建一个类R2C_SayGoodbyeHandler,用于处理服务器单向消息
public class R2C_SayGoodbyeHandler: AMHandler<R2C_SayGoodbye>
{
    protected override void Run(Session session, R2C_SayGoodbye message)
    {
        Log.Debug(message.Goodbye);
    }
}
服务端
在Server/Hotfix/Demo下新建一个文件夹,Login
新建一个类
[MessageHandler]
public class C2R_LoginTestHaandler : AMRpcHandler<C2R_LoginTest,R2C_LoginTest>
{
    protected override ETTask Run(Session session, C2R_LoginTest request, R2C_LoginTest response, Action reply)
    {
        ...
    }
}
命名规范是:客户端协议名Handler
必须继承AMPrcHandler,两个泛型就是C2R和R2C的协议,这个类的具体意义不做解释
然后实现方法
// session代表服务器向客户端的连接,与客户端会话不是同一个东西
// request即客户端发送是消息
// response即服务端需要返回去的消息
// 调用replay代表发送
protected override async ETTask Run(Session session, C2R_LoginTest request, R2C_LoginTest response, Action reply)
{
    response.Key = "111111";
    reply();
    await ETTask.CompletedTask;
}
然后再处理另一条单向协议
此时继承AMHandler
public class C2R_SayHelloHandler: AMHandler<C2R_SayHello>
{
    protected override void Run(Session session, C2R_SayHello message)
    {
        Log.Debug(message.Hello);
        // 服务端可以通过sessiton发送单向协议
        session.Send(new R2C_SayGoodbye() { Goodbye = "Goodbye" });
    }
}
测试
修改登录逻辑
public static class UILoginComponentSystem
{
   public static void OnLogin(this UILoginComponent self)
   {
      // LoginHelper.Login(
      //     self.DomainScene(),
      //     ConstValue.LoginAddress,
      //     self.account.GetComponent<InputField>().text,
      //     self.password.GetComponent<InputField>().text).Coroutine();
      LoginHelper.LoginTest(self.DomainScene(), ConstValue.LoginAddress).Coroutine();
   }
}
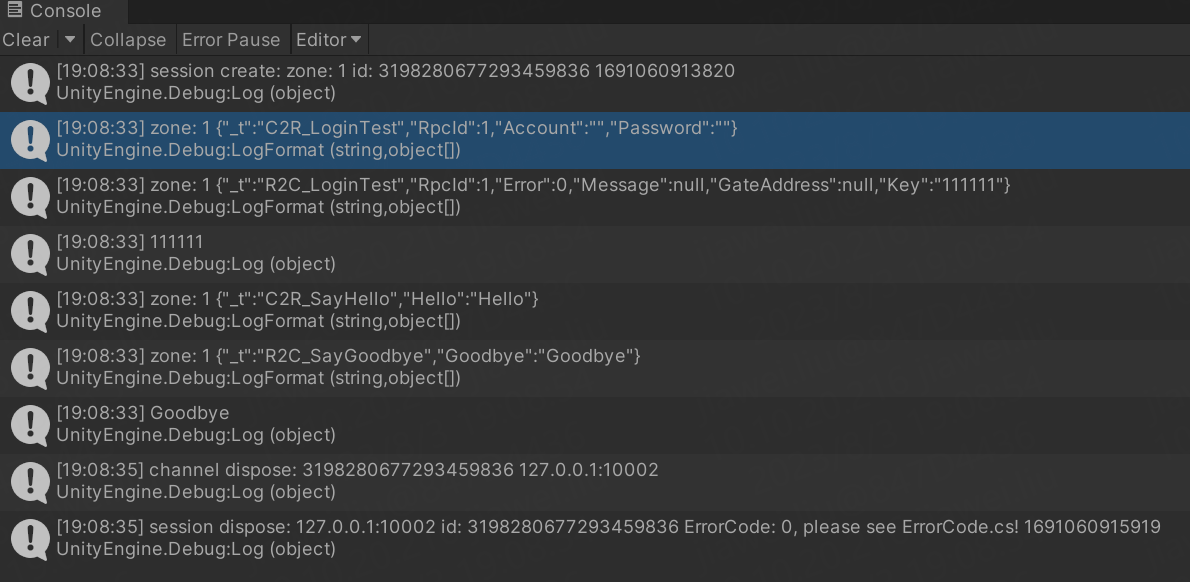
编译,运行服务器,运行Unity,登录

Actor

服务器进程间通讯,协议需要定义在InnerMsg中
格式基本相同
//ResponseType G2R_GetLoginKey
message R2G_GetLoginKey // IActorRequest
{
	int32 RpcId = 90;
	string Account = 1;
}

message G2R_GetLoginKey // IActorResponse
{
	int32 RpcId = 90;
	int32 Error = 91;
	string Message = 92;

	int64 Key = 1;
	int64 GateId = 2;
}
找到C2R_LoginHandler处理方法
[MessageHandler]
public class C2R_LoginHandler : AMRpcHandler<C2R_Login, R2C_Login>
{
   protected override async ETTask Run(Session session, C2R_Login request, R2C_Login response, Action reply)
   {
      // 随机分配一个Gate
      var config = RealmGateAddressHelper.GetGate(session.DomainZone());
      Log.Debug($"gate address: {MongoHelper.ToJson(config)}");

      // 向gate请求一个key,客户端可以拿着这个key连接gate
      G2R_GetLoginKey g2RGetLoginKey = (G2R_GetLoginKey) await ActorMessageSenderComponent.Instance.Call(
         config.InstanceID, new R2G_GetLoginKey() {Account = request.Account});

      response.Address = config.OuterIPPort.ToString();
      response.Key = g2RGetLoginKey.Key;
      response.GateId = g2RGetLoginKey.GateId;
      reply();
   }
}
当接收到客户端登录请求时,首先随机分配一个网关,其算法也很简单
public static class RealmGateAddressHelper
{
   public static cfg.StartSceneConfig GetGate(int zone)
   {
      var gates = new List<cfg.StartSceneConfig>();
      foreach (var config in LuBanComponent.Instance.GetAllTable().StartSceneTable.DataList)
      {
         if (config.SceneType == cfg.Enum.SceneType.Gate)
            gates.Add(config);
      }
      if (gates.Count > 0)
      {
         return gates[RandomHelper.RandomNumber(0, gates.Count)];
      }
      return null;
   }
}
我们的配表是这样的

网关服本身就是一个Actor,所以我们拿他的InstanceId作为唯一Id,就可以向对应的Actor发送消息了
然后拿到对应网关的地址,再返回给客户端
IActorLocationMessage

在OuterMsg中编写如下测试消息
//ResponseType M2C_TestActorLocationResponse
message C2M_TestActorLocationRequest //IActorLocationRequest
{
	int32 RpcId = 90;
	string Content = 1;
}

message M2C_TestActorLocationResponse //IActorLocationResponse
{
	int32 RpcId = 90;
	int32 Error = 91;
	string Message = 92;
	string Content = 1;
}

message C2M_TestActorLocationMessage //IActorLocationMessage
{
	int32 RpcId = 90; //ActorLocation消息,需要RpcId,尽管这条消息不需要服务器回复
	string Content = 1;
}

message M2C_TestActorMessage //IActorMessage
{
	string Content = 1;
}
因为Actor消息需要发给真正的玩家,所以我们需要写在玩家生成之后
可以把测试代码写在SceneChangeHelper.SceneChangeTo的最后
public static class SceneChangeHelper
{
    // 场景切换协程
    public static async ETTask SceneChangeTo(Scene zoneScene, string sceneName, long sceneInstanceId)
    {
        ...

        try
        {
            var session = zoneScene.GetComponent<SessionComponent>().Session;
            var res = (M2C_TestActorLocationResponse)await session.Call(
                new C2M_TestActorLocationRequest() { Content = "C2M_TestActorLocationRequest" });

            Log.Debug(res.Content);

            session.Send(new C2M_TestActorLocationMessage() { Content = "C2M_TestActorLocationMessage" });
        }
        catch (Exception e)
        {
            Log.Error(e.ToString());
        }
    }
}
先发送了一条需要服务器回复的Actor消息,然后又发送了一条不需要服务器回复的Actor消息
对应服务端的处理逻辑如下
[ActorMessageHandler]
public class C2M_TestActorLocationHandler: AMActorLocationRpcHandler<Unit,C2M_TestActorLocationRequest,M2C_TestActorLocationResponse>
{
    protected override async ETTask Run(...)
    {
        Log.Debug(request.Content);
        response.Content = "M2C_TestActorLocationResponse";
        reply();
        await ETTask.CompletedTask;
    }
}
[ActorMessageHandler]
public class C2M_TestActorLocationMessageHandler: AMActorLocationHandler<Unit,C2M_TestActorLocationMessage>
{
    protected override async ETTask Run(Unit unit, C2M_TestActorLocationMessage message)
    {
        Log.Debug(message.Content);
        MessageHelper.SendToClient(unit, new M2C_TestActorMessage() { Content = "M2C_TestActorMessage" });
        await ETTask.CompletedTask;
    }
}
区别在于,需要回复的消息,继承RpcHandler
对应的客户端处理
[MessageHandler]
public class M2C_TestActorMessageHandler: AMHandler<M2C_TestActorMessage>
{
    protected override void Run(Session session, M2C_TestActorMessage message)
    {
        Log.Debug(message.Content);
    }
}
编译运行
